
Thursday, June 27, 2013
Tip of the Day - Nasturtiums
Grape Salad
This is a perfect dessert for a hot summer night. It is sooo yummy and very healthy too!
Ingredients:
3 cups of grapes
1/2 cup of plain yogurt
2 oz. softened cream cheese
2 tbsp. honey
1/4 tsp. vanilla extract
2/3 cup chopped pecans (walnuts would be yummy too)


Wednesday, June 26, 2013
Tip of the Day - Cucumbers

June Gardening Checklist

- Plant the rest of your tomatoes, peppers and basil if you haven't finished that yet. There is still a bit more time.
- Plant another round of beans, corn and lettuce to keep the harvest going after the first round is harvested. Put lettuce under the cover of a larger plant to keep it from burning up in the heat and sun.
- Plant winter squash and start some seeds (in pots) for fall harvests of cauliflower, broccoli and cabbage.
- Plant more cilantro for another harvest.
- Mulch your berries.
- Fill in any bare spots with marigolds, zinnias or dahlias.
- Cover your potatoes with straw, soil or mulch.
- Keep those tomatoes staked up.
- Plant pumpkin seeds for a Halloween harvest.
- Thin your peach and apple trees so that the fruit is about 6 inches apart.
- Keep harvesting your lettuce, radishes and peas!
- Weed anything that is growing too close to your plants, especially anything that has overtaken your veggies in size, or looks unsightly to you.
- Keep an eye out for pests. Hand picking pests or dusting with wood ash or diatomaceous earth are great organic pest control options.
- Keep your flowers dead-headed and watered to encourage constant blooms.
- Pinch back the suckers on your tomato vines.
- Turn your compost pile! During long stretches of heat and dry weather, water it down. You don't want it to dry out.
- Enjoy the beginnings of the summer harvest and start prepping your kitchen for the abundance that you want to put up for the rest of the year!


Tuesday, June 25, 2013
Tip of the Day - Fooled You Peppers

Donna's Caramel Popcorn

Last week, we unexpectedly lost my Aunt Donna. She was one of the sweetest souls ever to walk the face of the earth. Earth's loss is Heaven's gain. This is a recipe that she shared with me while I was studying home economics in middle school. Every time I make her popcorn, I remember her sweetness. This post is in her honor.
Ingredients:
2 sticks butter
1/2 cup white syrup
2 cups brown sugar
1/4 tsp. cream of tarter
1 tsp. salt
1 tsp. baking soda
6 - 7 quarts of popped popcorn
Mix butter, syrup and brown sugar; bring to boil for 6 minutes and keep stirring. Add cream of tarter, salt and baking soda. Stir until foamy; pour over popped popcorn. Spread popcorn on large cookie sheets after mixing well. Bake for 1 hour in 200* oven. Before the popcorn cools, dump it into a large paper bag, close the top and shake to break the caramel popcorn apart.

Monday, June 24, 2013
Light and Tasty Chicken Salad
Light and crunchy, sweet and savory, this chicken salad is wonderful as a simple sandwich on whole wheat bread. It would also be perfect dressed up on a pretty roll.
Here's how you make it:
Ingredients:
4 cups of cooked chicken, chopped
1/2 cup onion, diced
1/2 cup celery, diced
1 cup grapes, halved
1/2 cup dried cranberries
1/2 cup plain yogurt
1/2 cup mayonnaise
1/2 tsp. garlic powder
1/2 tsp. salt
1/2 tsp. pepper
1 tsp. lemon juice
1/2 cup chopped pecans


Mix well.


Slap some between two yummy pieces of bread and have a little lunch!

This is great for a make-ahead lunch or a picnic!
Thursday, June 13, 2013
Line Drying Your Laundry
Hanging your laundry out on a clothes line as one obvious benefit of saving you money on your gas/electric bill, but let me tell you, it has many other benefits as well. Line drying doesn't wear out your clothes as quickly as the dryer does. The sunshine helps to kill any germs that may have gotten left behind after the washing machine has done it's job. Sunshine also helps to lighten or even remove some of those stubborn leftover stains as well. Line drying also makes your clothes smelly truly fresh. This is freshness that you don't get out of a bottle, it's the real stuff! Here are a few tips for line drying your laundry.
 1. On your washing machine, set your spin cycle on low. Leaving a little more moisture in the clothes helps with the wrinkles.
2. Use 1/4 cup of vinegar in the rinse cycle and don't over do it on the detergent, more is not better.
3. To whiten whites, add 1/4 cup of lemon juice to the rinse cycle of whites.
4. Hang your shirts and pants upside down.
5. Take your laundry off the line when it is mostly dry, but not entirely dry.
6. Fluff the laundry in the dryer using the low or no heat option, for about 5 minutes. Of course this is totally optional. If you have hung your clothes out on a particularly breezy day, the wind may have fluffed your clothes for you.
 If you don't have a clothes line set up in your back yard, don't worry, there are other options for you. While I wait for the hubby to put my clothes line up, I am using some ropes attached to the awning on my back deck. It is working well for now. I have also used camping clothes lines. These are very inexpensive and have the added bonus of being easily moved. You can simply wrap them around a pair of trees, fence posts or deck posts, clip the line to the clasp to tighten and you have an instant clothes line. You could also use a folding drying rack.
My absolute favorite thing about line drying is how my laundry smells afterward. Right now, my laundry is being scented by the roses and honeysuckle that are growing nearby.
 Before the roses and honeysuckle, it was honey locust blossoms and lilac before that.

2. Use 1/4 cup of vinegar in the rinse cycle and don't over do it on the detergent, more is not better.
3. To whiten whites, add 1/4 cup of lemon juice to the rinse cycle of whites.
4. Hang your shirts and pants upside down.
5. Take your laundry off the line when it is mostly dry, but not entirely dry.
6. Fluff the laundry in the dryer using the low or no heat option, for about 5 minutes. Of course this is totally optional. If you have hung your clothes out on a particularly breezy day, the wind may have fluffed your clothes for you.

My absolute favorite thing about line drying is how my laundry smells afterward. Right now, my laundry is being scented by the roses and honeysuckle that are growing nearby.

Monday, June 10, 2013
Tip of the Day - Stain Lifters

I have 4 favorite stain lifters for my dirty laundry.
They are cheap, easy to use and always in my pantry or laundry room.
1. Vinegar- I pour this straight onto grass stains. I also use it in place of fabric softener. I pour 1/4 to 1/2 cup of vinegar into my fabric softener dispenser. It leaves my clothes soft and fresh. Plus, it kills any germs that the laundry soap may have left behind, and rinses away any left behind soap.
2. Rubbing Alcohol - Squirt this onto ink stains and it then toss it into the wash.
3. Hydrogen Peroxide - I most commonly use this on urine or sweat stains, as well as berry or sauce stains. I spray the stain, let it sit a few minutes before tossing it into the wash.
4. Fels Naptha or Homemade Lard Soap- This is best for oily or grungy dirt stains. Just moisten the stain and rub the bar of soap into the stain, then launder as usual.
Tuesday, June 4, 2013
Goose Berries are Ready!!!

Here are a few tips for picking:
1. Wear good gloves. Something that the thorns won't poke through too badly, and something that isn't too big or baggy.
2. Wear long pants and long sleeve shirt. This will protect you from bugs, thorns and poison ivy.
3. Take a bucket or basket that won't let the tiny berries fall through.
4. Take a kid with you. Kids can get down and reach some of the hard to get places. Plus, kids love being in nature. My 9 year old kept tasting berries, saying, "this is so relaxing and peaceful! I love this!"
5. Don't be afraid to move the branches around. This is where those gloves come in really handy. Pull, lift and move the branches out of the way, picking the top and underside of each branch. Part the bush so that you can pick the berries on the top and bottom of the bush, the inside and the outside.
6. Once you have picked all of the berries, walk around the bush and re-check it from another direction. I bet you missed some.
7. The green berries are the ones you want for cooking. The purple or black berries have over ripened.
~Rebecca
Monday, June 3, 2013
Tip of the Day~Never Work Wet Soil!

Don't walk around on it. Working wet soil, especially if it has a high clay content, makes for hard soil. Hard soil. Think blacktop, concrete, rocks. Hard soil.
Just take a moment and thank the Father for the rain and go back inside and bake something, or read a book or look over Mom's comp. list. Maybe you can work in your soil tomorrow if it dries out a bit.
This is Poison Ivy- Gardeners Beware!


This is also poison ivy.
Poison ivy vines and is often found in the timber or trees climbing right up the trunks. 
This is a rose.
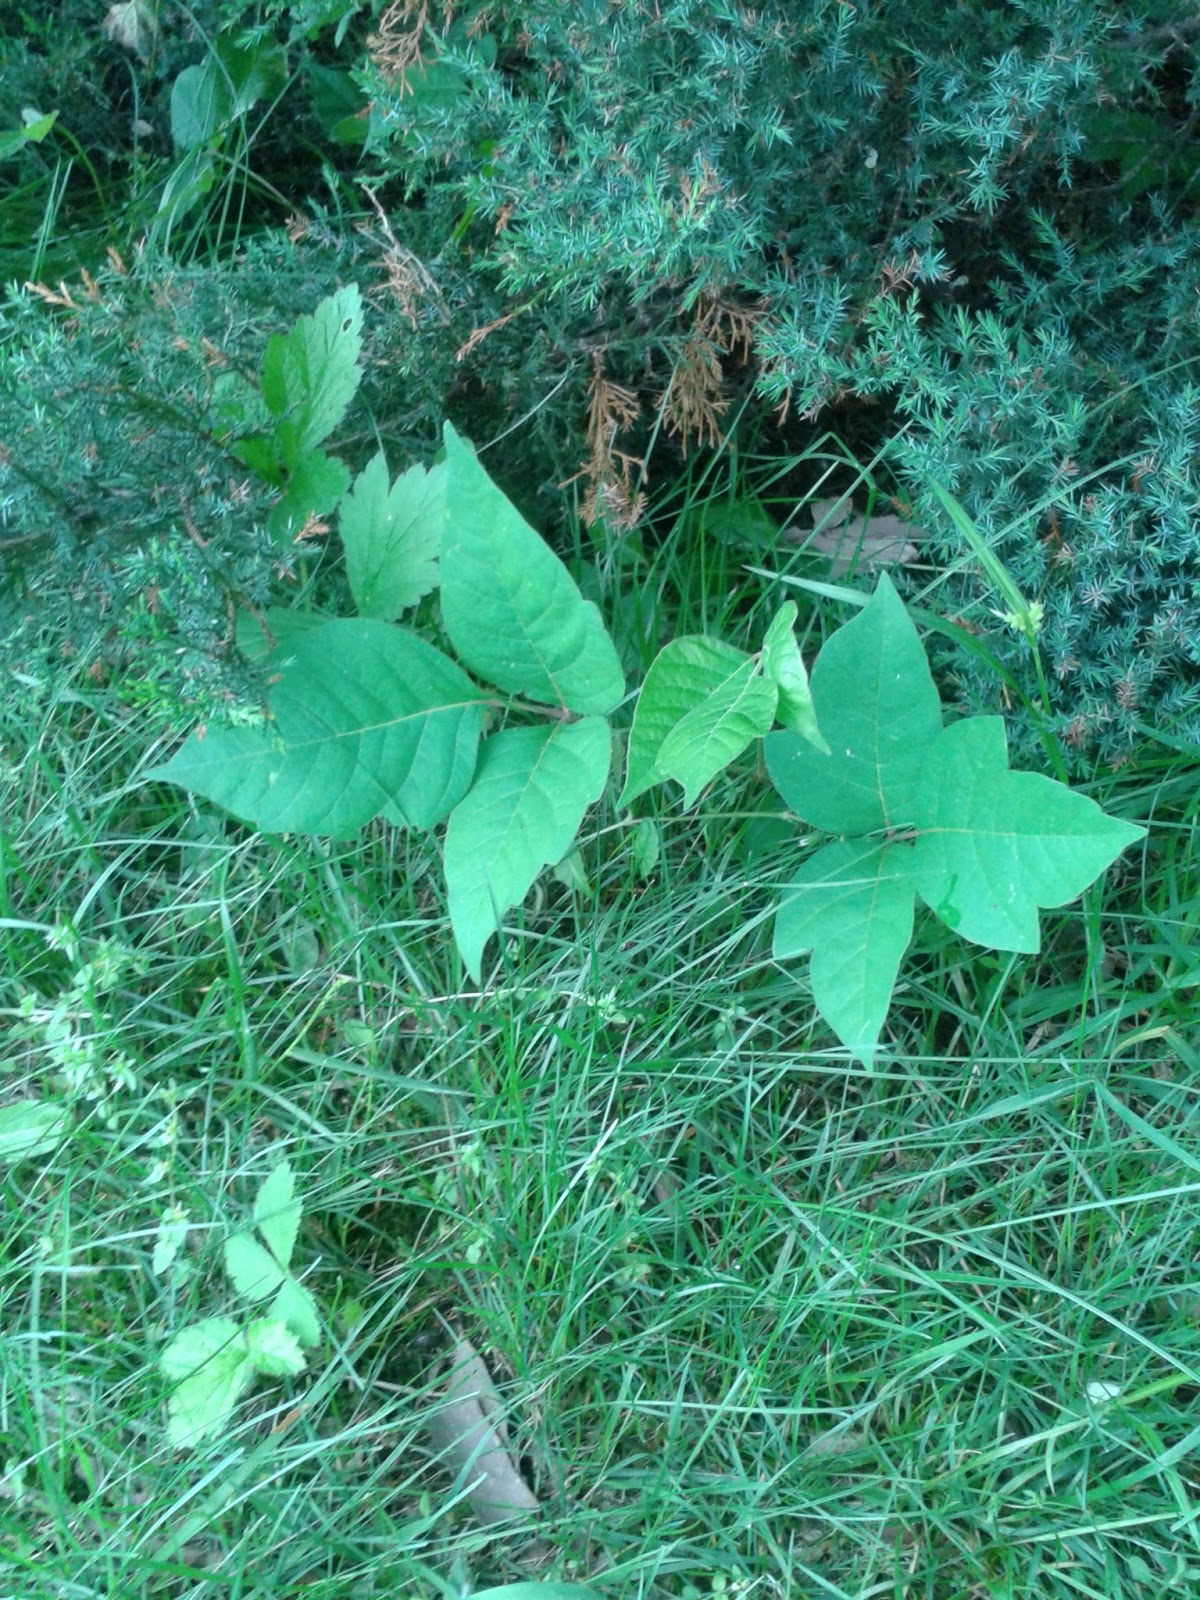
This is poison ivy.
It can also be found in the grass.
Notice the three leaves.

These are sunflowers.
They are babies...aren't they cute!

These are poison ivy. Not so cute!

Nasturtiums.

Poison.

Gooseberries. Lots of poison around the berry bushes!

Snapdragons. Lots of poison under these snapdragons.

Poison Ivy.

Geraniums.

Poison Ivy.
Got it?
Leaves of 3 ~ Leave them Be!
Think you are one of those folks who are not allergic. Still be careful because a sensitivity can rare it's ugly head at any moment. When it does, you will itch. Like Crazy. For about a Month.
Happy Itch Free Gardening!
Subscribe to:
Posts (Atom)