Pages

Sunday, April 28, 2013

French Bread with Herbs


Here is an old favorite recipe that I am moving over from my old Teeny Tiny Kitchen Blog.  Early spring it the perfect time to harvest chives for this bread! 
The beauty of this recipe is that it is easily changed up and customized to what you like best, or what you have on hand.  I made mine with butter and chives.  The Stephenson Ranch has some lovely chives out in the herb garden.
And, butter just happens to be one of my favorite ingredients of all time.
So, I married the two and came up with this:
Here is how I did it:
Ingredients:
French Bread (I used a loaf of homemade whole wheat I had made the day before.)
Butter ( Salted, although you could substitute olive oil.)
Chives (Again, you could substitute or mix your favorite herbs.  Rosemary is wonderful, too!)

Slice the loaf of French Bread down the middle lengthwise, and place on a large cookie sheet.
The spread each loaf generously with the softened butter.  I used a half of a stick of butter on the two loaves (my jeans have been tight lately).  However, it is absolutely insanely yummy when you use a whole stick.  
Then pop them into a 350* oven for 8 to 10 minutes.  
During this time the butter will melt down into the bread and the bottom and outside of the crust will begin to toast.
Pull  it out and sprinkle on the herbs, as light or heavy as you would like.  
Put it back into the oven, but this time broil it on high for about 2 minutes. 
Keep a close eye on it!!!  You want the butter to caramelize and the edges of the bread to really brown up, but you don't want any burning.  If you take you eyes off of it, it can really burn fast!


Vanilla Latte Mix


I love coffee!  This recipe makes a quick, rich and creamy coffee that is great for on the go, or sharing with someone you love.  I really like to pour the mix into pretty little jars, so that my friends can have some to take home with them.  This recipe also makes quite a bit, so there is plenty for sharing.
Measure out the following ingredients into a large bowl:
3 cups of instant dry milk powder
1 cup of instant coffee
1 1/2 cups powdered coffee creamer
1 cup of sugar
2 regular size boxes of vanilla pudding mix (the instant kind)

Mix until well combined.  At this point you could say it's done and go ahead and whip yourself up a nice steamy cup, but look at how pretty it is when I blend it all together in my handy dandy processor.

Good thing I didn't add that extra pinch of sugar ;)

Stir 1/4 cup of the Vanilla Latte Mix into 3/4 cup of hot water and enjoy!

I should also mention, this stuff smells really good too!

Tip of the Day- Cheaper Greek Yogurt

I do love the texture of Greek yogurt, but I don't love how much more expensive it is than regular yogurt. Did you know that Greek yogurt is made by straining the whey off of regular yogurt, creating that thick creaminess.  You can do that at home very easily.
All you need is yogurt, a bowl, strainer and a thin towel, cheesecloth or coffee filter (for a small strainer).
Put the strainer in the bowl, the cloth in the strainer and the yogurt in the cloth.  Then pop it into the fridge until it has reached the desired thickness and you have Greek yogurt.  A cheesecloth or coffee filter will produce results quicker than a thin towel.
If you let all of the whey strain out, they you have a product called yogurt cheese, which can be used in place of cream cheese.  It is amazing spread on a whole wheat English muffin!

Friday, April 26, 2013

10 Reasons to Visit Chillicothe's Farmers Market

On May 4th at 8:00 a.m. the Chillicothe Farmers Market will open for the season!  You will find it on the West side of the Livingston County Courthouse on Washington Street in Chillicothe, MO.
Here are 10 reasons to visit the Farmers Market.
1. You will only find Super Fresh and Local produce at a Farmers Market.  Produce at the grocery store has likely been sitting around waiting for you for weeks.

2. You will find local hand-made products that are better for you and your family than the chemical laden mass produced products.

3. You will find a wonderful variety of homemade baked goods made with pure and wholesome ingredients.  The quality of homemade baked goods by far surpasses any grocery store product.

4. Your money stays in the local economy.

5. The goods your purchase at a farmers market are almost always produced in a sustainable way, which is very good for the environment.

6. Most of the produce is grown using only organic fertilizers and pesticides.

7.  Shopping at a Farmers Market supports local farmers and vendors.

8. The vendors at your Farmers Market can inform you of their products, where and how they were produced and the best way to use the product.

9. The experience of shopping at a Farmers Market is organic, relaxing, fun and educational.  It is an experience you can not replicate at any other type or market.

10.  My favorite thing about a Farmers Market is the unique products that are available.  Hand-made soaps made with beautiful smelling, insect repelling essential oils and heirloom tomatoes are my ultimate favorite!  You can't find those at a grocery store either!

Fried Dandelion Blossoms - From Mother Nature's Grocery Store

Did you know that you can eat dandelions?  Did you know that dandelions are good for you?  We use the green in fresh salads and we fry up the blossoms.  Fried dandelion blossoms is something that my grandmother made for us as a special treat.  We loved them and always gobbled them up just as soon as she plucked them out of the oil.  Now, this time of year, my own kids are clamoring for me to fix them fried dandelion blossoms.  If you have never tried them, you should.
Before diving into the recipe, I want to make a special note, Never used dandelions that have been sprayed with pesticide or herbicide or fertilizer (although I don't know anyone who fertilizes dandelions, you can never be too safe).
Here is how you make these special treats:
Ingredients:
2 quarts of cool water
4 cups of dandelion blossoms
1 palm full of salt
3 eggs
1/4 cup of milk
2 cups of flour
Canola oil - enough to submerse the blossoms, the amount will depend upon the size of pan you use

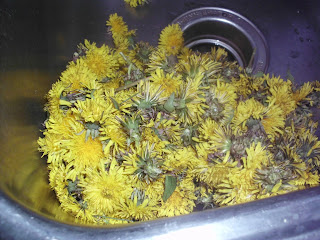
 First, send your kiddos out to pick dandelion blossoms.  Chances are they will pick too many, but in this recipe, you only need about 4 cups.
 Each blossom needs to have the stem completely removed.  Any remaining stem will cause a very bitter blossom.  Just pinch them off.
 Toss the blossoms into a large bowl with about 2 quarts of cool water and a handful of salt tossed in.  Give the blossoms a bit of a swish with your hand to knock off any dirt and bugs.  Soak the blossoms for at least 1 hour, but not more than 2.  This is going to completely remove any bugs from deep inside the flower and kill them.
 Scoop the blossoms out of the bowl, leaving the dirt in the bottom and move the blossoms over to a strainer and give them a good rinse.  Shake out as much excess moisture as possible and leave them to strain while you prepare your breading and egg wash.  You should also preheat your canola oil.  I fry mine up on medium heat.
 In one bowl whisk together 3 eggs and 1/4 cup of milk.  In another bowl, measure out about 2 cups of flour.
 Toss a handful of blossoms into the egg wash.
 Then, dredge in the flour, shaking off excess flour.
 Carefully place the blossoms into the hot oil and allow them to fry until the bottom side is golden brown.
 Flip the blossoms with a slotted spoon and remove when the entire blossom is golden brown.
 With a slotted spoon, remove from the hot oil and place on a plate with a dry paper towel.  Allow the paper towel to soak up the excess oil.  Lightly salt, to taste, each batch as soon as it is placed on the towel.
Dandelions are best served up with your favorite summertime sandwich and fruit!

Thursday, April 25, 2013

Tip of the Day - Always Wash Your Melons!

Before you cut a melon, always give it a good scrub under running water.  Melons have lots of nooks and crannies for bacteria to hide. When you cut into an unwashed melon your knife can pick up that bacteria and spread it into the flesh of the fruit, which will then be eaten.  Yuk!

When you're done peeling the rinds off, be sure and toss them into your compost pile!

Healthier Butter Spread

Butter is among one of my favorite ingredients, I have to admit.  Although it is much healthier than margarine made with fake ingredients, butter does have a lot of saturated fat.  I like to make my own healthier spread, which still has some butter, so it has that great butter flavor, but it is blended with olive oil and coconut oil.  Olive and coconut oils are made entirely of the good for you fats. Coconut oil is a solid at room temperature, but if you heat it up just a little bit, it melts.  This makes for a lovely spread.
Here is how you make the spread:
Ingredients:
1 stick of butter, softened
1/2 cup coconut oil, solid, not liquid
1/4 cup olive oil
1/4 teaspoon salt
If you are not crazy about the olive oil taste, or want something with a more neutral flavor, substitute canola oil for the olive oil.  Canola is a heart healthy fat as well.
Cream together butter and coconut oil.
Toss in the salt.
Then stream in the olive oil.

Blend until thoroughly combined.

Pour the spread into a container with a lid.  At this point the spread is a little too runny because the mixing has warmed up the coconut oil.  Seal it up and pop it into the fridge for a bit.  After it chills, it will be a firmer consistency, more like butter.  If you want it to be more spreadable just let it sit out on the counter for about 5 minutes to warm up.
~Rebecca

All*You Magazine

Got my All*You Magazines today If you don't have a Subscription of this Magazine it is so worth getting one. You can pick them up at Walmart at the check out but its so much cheaper to get a subscription. I get mine from the girl scouts. They are actually selling them right now. I just recieved a letter from my granddaughter wanting me to buy. Look up a local girlscout. They are packed full of coupons and savings. ~ Ethel

Wednesday, April 24, 2013

Tip of the Day

 Another way to save money.   Well I run a day-care and I use bunches and bunches of hand soap.  Occationally I get it on sale with a coupon so I do buy it.  But I also reuse the dispensers.  I love the Dial Complete foaming dispenser.  I then buy shampoo, body wash, dish soap on sale with a coupon.  Like the VO5 that is on sale this week $ .68 with a $1/4 coupon that will make it $ .43 I then just put a squirt in the empty bottle fill it up with water shake it alittle and there you got it.  Hand soap really cheap.  ~ Ethel

Roast Sausage and Veggies

This meal is a family favorite, especially for my meat and potato loving guys.  I love it because it is super quick and easy to toss together.  It is also another meal that you can easily substitute any fresh veggies that you already have on hand.  In this recipe, I am using onions, potatoes and carrots, but mushrooms, bell peppers, asparagus or broccoli would be delicious too.
Here is the recipe:

The ingredients are very simple.  Your favorite large  link sausage, potatoes, carrots, onions, cooking spray, oregano, garlic powder, onion powder, salt and pepper. Measure out the amount of meat and veggies according to the amount your family will eat.
Pre-heat your oven to 425*. Cut your veggies in to smaller pieces.  You want your potatoes thin enough to soften and crisp, and not still be raw in the middle.  Toss them onto a large baking sheet that has been sprayed with cooking spray.
 Add your carrots and sausage, which has been sliced into 1/4 inch rounds.
Sprinkle the oregano, onion powder and garlic powder over the top.
Salt and pepper the meat and veggies.  Kosher salt is perfect for this dish.  Then using your hands or a couple of large spoons, toss the meat and veggies to spread the seasonings evenly throughout.
Bake in a 425* oven for 45 minutes to 1 hour.  You want your veggies to be slightly golden brown and softened.


Monday, April 22, 2013

Mother Nature's Grocery Store - Spoonbill Fish

An abundance of delicious foods can be easily found growing wild and free for the taking right in your back yard, out in the country or even on conservation land, where prohibited.
All you need to know is where to find such wonderful delicacies and how to prepare them.  If you need to harvest from land other than your own, you will need permission from the landowner, or contact the Missouri Department of Conservation for the rules and regulations on harvesting from conversation land.
Some of the bounty I regularly enjoy from Mother Nature's Grocery Store are fish, deer, morrel mushrooms, dandelion blossoms, black berries, gooseberries, mulberries and walnuts.  I know that in Northwest Missouri, there is much more available and I am excited to seek out and harvest a larger variety of foods.  Beyond the native animals that are available to hunt, or even at the grocery store, there are many produce items that you can easily pick.  Persimmons, elderberry and violets are something I would love to try.
This weekend, my family and I spent the weekend taking part in the annual spoonbill season.  Spoonbill, also known as paddlefish, have a harvesting season from March 15 thru April 30 in Missouri.  Harvesting spoonbill is done by snagging them with are large snagging rod and reel set-up  along with a couple of large treble hooks and 14 - 16 ounce sinkers.  Essentially your hooks and lines rake the river bottom and by chance you hook a nice size spoonbill.  We usually snag in Warsaw on the Osage River.  The size requirements there are 34 inches from the eye of the spoonbill to the fork in the tail.  This weekend, we were lucky enough to snag this 70 pound female.  My husband did an excellent job bringing her in!  Here is more information about snagging for spoonbill in Missouri.
Click here for the Missouri Paddlefish Snagging Report
The Spoonbill is a very interesting fish because of it's unusual anatomy.  It has a large bill extending from the front of the fish.  Spoonbill have a slick skin rather than scales and they do not have a single bone in their bodies.  When cleaning a spoonbill, you must remove the fat and the red meat from the white meat.  The white meat is the meat you want to eat.  I know of two ways to clean a spoonbill.  First, if you have a female, you are require by law to remove the eggs at the body of water you caught the fish in and dispose of them there.  They will be recycled back into nature.  The eggs are protected from harvesting due to poachers illegally harvesting female spoonbill.  The innards should be removed.  Then, you may either fillet the meat from both sides of the fish's body or you can remove the head and tail, then carve the meat into steaks.  After removing the meat from the body, remove the skin, fat and red meat from the white meat.  Here is a youtube video that shows someone else's method, which is also very simple.  Warning: this video contains blood and guts!
Click Here to see how to clean a spoonbill
I personally prefer to bread my spoonbill in a cornmeal breading and fry it in canola oil, but there are many ways spoonbill can be prepared.  Spoonbill is a light white meat that more resembles chicken than fish.  When the meat is properly cleaned of fat and red meat, there is very little or no fishy taste.  It is one of the few fish my husband enjoys eating because of it's light flavor.

Click Here for Fried Spoonbill Recipe

Click Here for Baked Spoonbill Recipe

It's not too late, you still have 1 week left to catch your own spoonbill!  Water temperature and flow is perfect for harvest on the Osage River right now!  On April 27th the Old Oar House on the Osage River is holding a spoonbill tournament.  You could walk away with not only a prize fish, but a tournament prize as well!
~ Rebecca


Coupon tip of the day

Go check out the new printables   coupon.com 

Thursday, April 18, 2013

A Coupon Binder

This is my coupon binder.  I have a fancy one with a zipper and a strap.  Many people keep a simple binder and put it inside of a bag.  Personalizing a binder and adjusting it to your tastes and needs are important.

Inside of my binder, I keep my weekly ads.  

I also have several dividers. Some of them are the cheap paper dividers, some are pocket dividers.  On each divider, I write a category. Meats, produce, dairy, grocery, snacks, beverages, frozen foods, paper goods, His self-care, Her self-care, pharmacy, cleaning and restaurant are the tabs that I have.

 These are the coupon pockets.  This is the baseball card size. You can also find a coupon assortment which has several sizes. These make your coupons easy to organize and find while you are shopping.

A coupon binder can be quite a bit of work.  Coupons should be clipped and sorted into the binder weekly and the expired coupons need to be removed from the binder weekly.  This extra work often has huge payoffs.  The beauty of having spent extra time organizing your coupons in such a fashion is that you can go down clearance and sales isles and maximize your savings.  Many, many times I have come across items that are not advertised and they match up with a high value coupon and make the item completely free.  Everything from toothpaste and razors, to cereal and pet flea spray, I have found for free in a clearance isle because of my organized coupon binder.

Here are a few tips for keeping one:
1. Don't get behind on your coupon clipping.  It can become overwhelming if you have 8 circulars to clip out.
2. You can store coupons back to back inside the pockets so that you can see coupons on the front and back side of each page.
3. If you have identical coupons with different expiration dates, you can keep them in the same pocket, just put the one that expires first in the front.
4. As you are in the store, flip through your sections and compare all of your coupons with the sales in those isles.
5. Copy your stores coupon and comp policy and keep it in the back of your binder.
6. Hole punch your comp. shopping list and keep it in the front of your binder.
7. Pull out any coupons that you know you want to use during your shopping trip and slip them into a front pocket or divider pocket.
8. Keep your shopping list in your binder.
9. You can find the coupon organizer pockets in the craft/scrap booking isle.
10.  Baseball card organizers work well to organize coupons, too.

Tip of the Day - Flax Seed

Add a boost of omega-3 oils and fiber to your baking mixes by stirring in a couple of tablespoons of milled flax seed.  It does not change the consistency of your baked goods.

Also, you can use milled flax seed as a substitute for egg or fat in most baking recipes.  3 tablespoons of milled flax seed can be substituted for 1 tablespoon of fat.  1 tablespoon of milled flax seed along with 3 tablespoons of water, can be substituted for 1 egg.

Saturday, April 13, 2013

Savings Savings Savings

Matching sales, or as I call it, comping and coupons really can save you loads of money.  It saves you time if you don't like to run all over town trying to catch all the deals.  Today, my shopping trip at Walmart was a success. I purchased $179.94 of product,  minus the comp savings $59.83 and coupons $46.40. I only spent $73.71.  I do go to Walgreens because of the reward deals.  I bought $50.04 of product and paid $24.95 plus have 10200 balance reward for my next visit ($10.00).  ~ Ethel

Tip of the Day - Grow Lettuce!

You can buy this beautiful artisan lettuce at Aldi right now for $1.99 a pack.  It's about a dollar more at Walmart.
Or...
You can plant your own! 
One pack of seed cost less than a pack of lettuce and you will harvest at least 10 times more!
It is a cool season plant that needs to be planted early in the spring.
It can be sown in a pot or bed. 
Cut leaf lettuces just above the ground when harvesting and it will grow back again and again.
It does fizzle out or bolt when the weather heats up, but can be replanted again in the fall.
It only takes 4 - 6 weeks from planting until harvest.
Leaf lettuce is extremely easy to grow!

April Gardening Checklist

1. Plant potatoes, peas, spinach, lettuce and other leafy greens and onions if you haven't already.
Radishes, onions, lettuce, garlic, peas and potatoes are all in the ground.
This is a firs year bed.  I will be doing plenty of weeding and mulching!
2. Harden off cabbage and plant. Be sure to protect by covering on super cold days/nights.
3. Start basil, tomato & pepper seedlings - indoors.
We have started nasturtium too.  Well, okay, I confess.  I killed my seed sown basil and so I bought a new plant to replace it because I couldn't wait to have fresh basil.  It is important to keep your seedlings well watered....trust me

4. Plant new beds of asparagus, rhubarb & strawberries.
My asparagus is in the ground.  After a few weeks the plants will be up and I will cover them again with the piled up soil.
5. Plant new shrubs and trees.
6. Fertilize established plants with compost and/or Epsom salts.
7. Divide clumping perennials.
This bad boy seriously needs to be divided and moved.  He also needs the John Deere tractors cleaned out of him.
8. Mulch between and around berries.
9. Plant pansies.  Yes, you can do this even if it snows again this week.  Lord. please don't let it snow again!
10. Direct sow seed poppies, alyssum, bachelor buttons, cosmos and calendulas.
11. Pull any weeds that have already started.  This will save you a lot of headache later on.
12. Remove leaf debris from beds and store for mulch or compost. Check out my free mulch link here!
13. Prune back roses.
~Rebecca
Source: Garden Wisdom and Know-How - Rodale Gardening Books